The Best Thermal Imaging Camera For Moisture and Mold Detection
This post may contain affiliate links. Read our full disclosure.
Thermography camera, infrared camera, thermal imaging camera… are these the same thing? What are the best thermal imaging cameras and can they detect mold? Let’s dive in shall we?
Detecting moisture intrusion problems is an excellent application for thermal imaging or infrared cameras. While leaks and moisture intrusion may be identified by obvious visual signs, such as water staining or mold growth, by the time visible evidence has presented itself significant damage may have already been done. In many cases, moisture or water intrusion may have been developing for a while before obvious signs become apparent. By employing thermal imaging and a moisture meter, homeowners and mold inspectors can locate moisture issues before they become large problems and lead to serious damage, as well as gather details in cases where moisture intrusion has already become obvious.
What is the difference between an infrared camera and thermal imaging cameras?
Very basically, infrared captures the heat coming off of an object and generates a picture of it, and thermal imaging captures the difference in temperature between an object and its immediate surroundings. When it comes to locating moisture, a thermal imaging camera is the better choice.
Advantages of Using a Thermal Imaging Camera
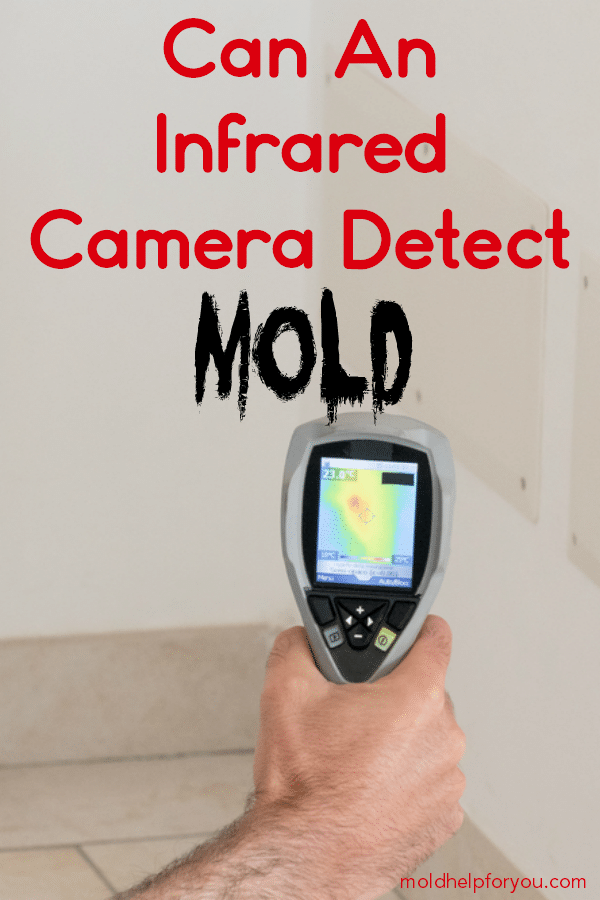
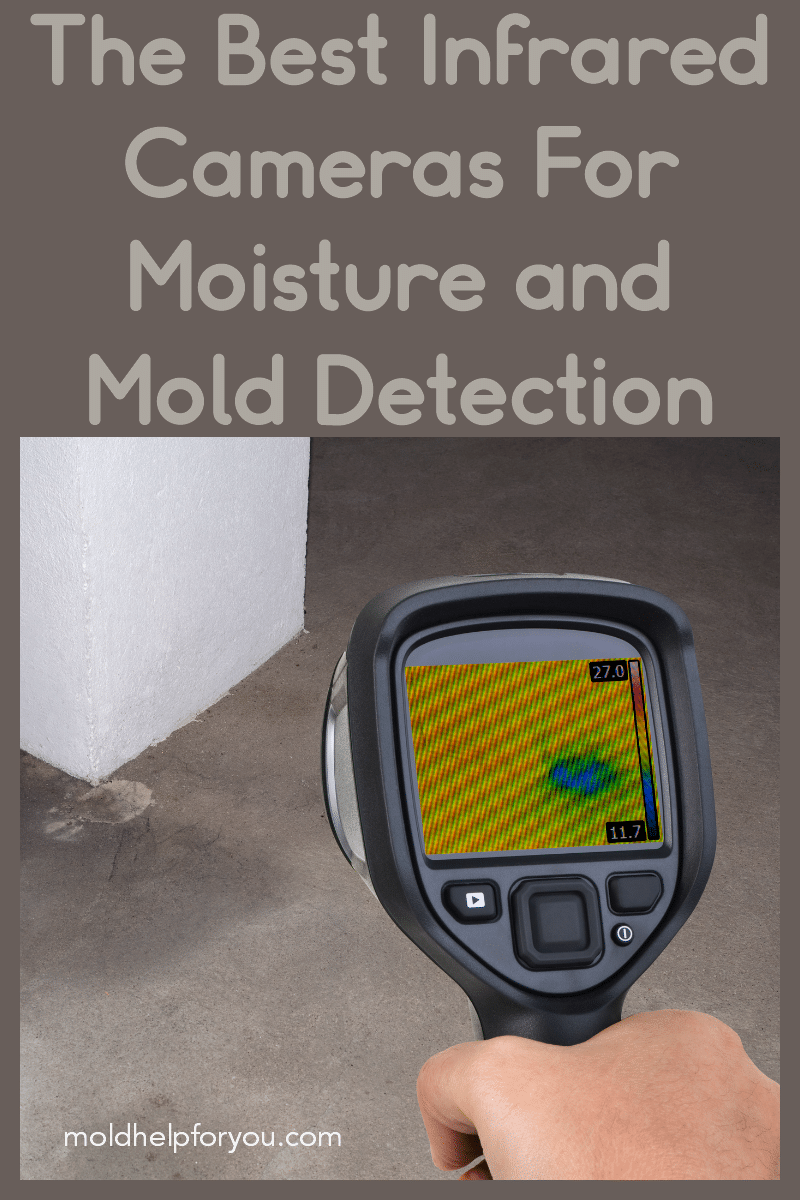
Using a thermal imaging camera provides certain advantages in locating moisture problems. Thermal patterns created by latent moisture become readily apparent when viewed through an infrared camera, even when they are not visible to the naked eye. This is because the thermal imaging camera sees the apparent temperature difference between wet spots and building materials. Water intrusion and excessive moisture within walls, under floors, and above ceilings will show up in the thermal image.
Thermal imaging can help homeowners and mold inspectors locate the sources and extent of moisture intrusion. Here’s a list of its advantages.
- It’s time-saving.
- It’s easy to set up.
- It allows examination of areas that are not visible to the naked eye.
- It allows examination of areas that are difficult to access, such as tall ceilings.
- It allows for larger areas to be examined quickly.
- It helps locate sources of moisture intrusion.
- It helps determine the extent of moisture intrusion.
- It allows the user to trace the moisture intrusion through other affected areas.
- It provides visual documentation of moisture intrusion.
- It identifies moisture without the need for direct contact in potentially unsanitary areas, such as behind toilets.
Disadvantages of Using a Thermal Imaging Camera
There are few disadvantages associated with using thermal imaging imaging to locate sources of moisture intrusion. There is a slight learning curve at first, but, with time, homeowners can become more adept at accurately reading images and utilizing the equipment to its fullest capabilities.
Best Practices
It’s important to remember that thermal imaging should be used in conjunction with a moisture meter to identify moisture intrusion problems. Once a potential trouble spot is located through thermal imaging, the problem can be verified with the moisture meter. You can learn more about moisture meters as well as which ones I recommend here.
Moisture Detection with Thermal Imaging Cameras
As a homeowner, a great way to prevent mold or extensive damage from a leak is to conduct a moisture inspection monthly. A thermal imaging camera makes this really easy.
At the beginning of your inspection, identify areas that are most at-risk for moisture intrusion, along with any visual evidence, such as staining, discoloration, and/or apparent wet spots. These surfaces can be scanned with the thermal imaging camera to locate the source of problems. Since the apparent temperature of wet spots will be lower than that of building materials, moisture will be visible through thermal imaging as dark areas.
It is also important to keep in mind that a house is a dynamic system, made up of many components that are all interconnected and interactive. Leakage or moisture intrusion at one point will likely affect other areas as it moves or grows. Attention should be paid to what other areas are at risk downstream from the point of moisture intrusion. For example, if an upstairs toilet is found to be leaking, the ceiling area in the room below it should be examined.
Using thermal imaging, all the areas affected by leaks or moisture at a specific location can often be traced down the line and documented, giving a fuller picture of the nature and extent of the issue.
Important Areas to Check with a Thermal Imaging Camera
When inspecting for moisture intrusion, there are many areas that may be more obvious than others to search, such as below-grade window wells and basement walls. It can be helpful to consider several areas that may be at risk so that a thorough inspection can be conducted without overlooking less-obvious areas.
Thermal imaging can used to find moisture in the following areas:
- In the kitchen around the sink, under the dishwasher, behind the refrigerator, and under the cooking range, as well as around vents and exhaust fans
- In bathrooms around plumbing fixtures and outlets, shower and bathtub enclosures, fixtures and vents, the toilet and bidet, and windows
- In and around the HVAC system
- Around the water heater
- In the attic, including roof pass-throughs and penetrations, connecting walls, vents and fans, and recessed lights
- In the basement, including walls, ductwork and crawlspaces
- In the laundry area around the washer and dryer hookups, drip pans and exhaust vents, as well as utility sinks
Can Thermal Imaging Cameras Find Mold?
Yes and no. Thermal imaging cameras will pick up areas of increased moisture and a patch of mold is very likely to be growing in an area with increased moisture.
Stachybotrus is one type of mold that in and of itself is very wet and sticky. So loosely, a thermal imaging camera may pick up a patch of mold growth. But typically it will not and there is no way to distinguish between a wet spot and a wet and moldy spot. Remember – there can still be mold growth without active moisture.
What Are The Other Uses For A Thermal Imaging Camera?
There are a LOT of uses for a thermal imaging camera. Let’s look at the ones that homeowners would find most useful.
- Detect unwanted pests – find out exactly where possums, rats or other animals are camping out in a roof space (without having to crawl through the roof).
- Termite detection – detect areas of potential termite activity in buildings.
- HVAC maintenance – check issues with heating, ventilation and air conditioning (HVAC) equipment such as the coils and compressors on refrigeration and air conditioning systems.
- HVAC performance – check how much heat is being generated by equipment inside a building and how the air conditioning ducting could be improved to deal with this.
- Air leakage – check for air leakage in air conditioning and heater ducting as well as around window and door frames and other building elements.
- Insulation defects – review the effectiveness of and find gaps in ceiling and wall insulation.
- Hot water – see how much energy hot water pipes and tanks are losing to their surroundings.
- Pipes & ducts – identify blockages in ventilation systems and pipe work.
- Heater performance – analyze the performance of heating systems including boilers, wood fires, and electric heaters.
- Glazing – evaluate the relative performance of window films and double glazing.
- Heat loss – see which areas of a particular room or building are loosing the most heat.
- Heat transfer – review the effectiveness of heat transfer, such as in solar hot water systems.
- Waste heat – find out which appliances are generating the most heat and therefore wasting the most energy.
- Underfloor heating – find out if electric underfloor heating is working properly and/or where a defect has occurred.
- Solar panels – check for electrical defects, micro-fractures or ‘hot spots’ in solar PV panels.
The Best Thermal Imaging Cameras For Moisture and Mold Detection
The world of thermal imaging cameras is pretty small. There are only a few companies that make them. However, there are a lot of different types of infrared cameras and a vast price range to choose from.
Why are thermal imaging cameras so expensive?
The thermal imaging cameras are priced according to the features they come with. Apart from the basic features such as the temperature range and sensitivity, thermal imaging camera cost varies with respect to the infrared resolution, multiple modes, touch screen display, battery life and other advanced special features they have equipped with.
Higher end infrared cameras are upwards of $2,500. We won’t bother looking at those. 😉 Instead, let’s look at the best thermal imaging cameras for homeowners.
Flir
Flir is the gold standard when it comes to thermal imaging. Their technology is unmatched and is used by professional mold inspectors world wide. While these thermal imaging devices might seem expensive, they are worth every penny and will remain useful for years and years.
Let’s take a look at my two favorite Flir devices.
Flir One Edge Pro
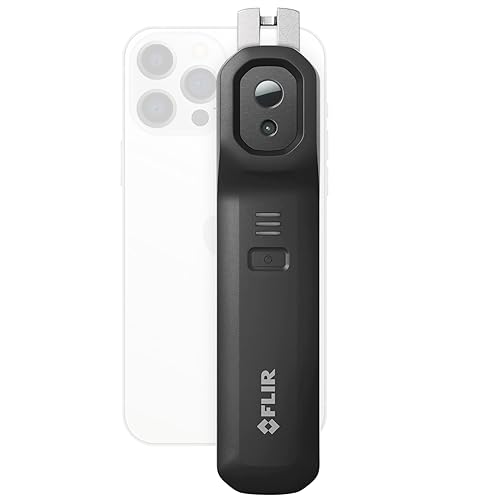
This thermal camera for smart phones combines VividIR™ and FLIR MSX® (Multi-Spectral Dynamic Imaging) so you can take crisp thermal images from any angle. It makes thermal imaging accessible to anyone! In fact, I have started using this almost exclusively since it is so convenient and the images are beyond compare.
- Compatibility – FLIR ONE Edge Pro infrared cameras connects wirelessly to your smart device and is usable with all Android or iOS devices including Iphone 15.
- Wireless – FLIR ONE Edge Pro connects to phones or tablets wirelessly so you can see in tight spaces or around corners.
- Clear images- High Resolution IR images with 640×480 visual resolution and 160×120 thermal resolution
- Accuracy – measures temperature within ±3°C or ±5% when the unit is within 15 °C – 35 °C and the scene is within 5 °C – 120 °C
- FLIR Ignite Clouf – Directly upload, organize, and share images from your Wi-Fi connected FLIR camera.
- Durable: Built to take the abuse that working on a jobsite dishes out every day, rated to take a drop from 2 meters and is built to last. You won’t be abusing it as a homeowner so the Flir One will last for years and years!
Learn more about the Flir One Edge Pro here.
Flir C5

If you prefer a camera in your pocket, the Flir C5 is for you! Identifying hidden problems is easy with the 160 × 120 (19,200 pixels) true thermal imager, MSX® (Multi-Spectral Dynamic Imaging), 5-megapixel visual camera, and LED flashlight. The C5 directly uploads and stores your images to the FLIR Ignite™ cloud, where you can organize and back up files. The battery last forever too!
Learn more about the Flir C5 here.
Check Out The Current Prices of All Flir Thermal Cameras Here
Seek Thermal Reveal
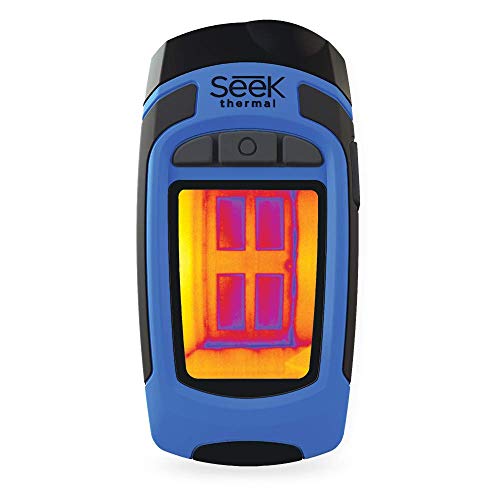
Seek’s Thermal Reveal is a cheap yet powerful thermal imaging camera that is very easy to use. It has decent resolution and temperature range.
The Reveal was built to deliver precise temperature readouts at impressive distances. It’s accurate up to 500 feet. Subtle temperature differences are detectable thanks to its fairly large sensor. At shorter ranges, this will give you an accurate picture of the state of moisture intrusions.
It has a powerful 300-lumen flashlight to illuminate dark attics, basements, or crawl spaces, but the camera can be effectively used in absolute darkness too. There’s no video capture, but you can take images and store them on the accompanying SD card.
Onboard software displays the temperature of anything you’re currently scanning, allows for an overview of stored images in a gallery, and shows you pertinent info like date/time, battery status etc. There are 7 different color gradients to choose from.
The main drawback is battery life when not in use.
Seek Thermal Reveal Specifications
- Dimensions:
5 x 2.4 x 1.2 in - Weight:
6.3 oz - Temperature
range (°F): 14 -302 - Sensor
size: 80×60 - Battery
runtime: Up to 10 hours - Field
of view: 41° x 31°
Check Out The Current Price Here
PerfectPrime IR0005 Infrared (IR) Thermal Imager & Visible Light Camera
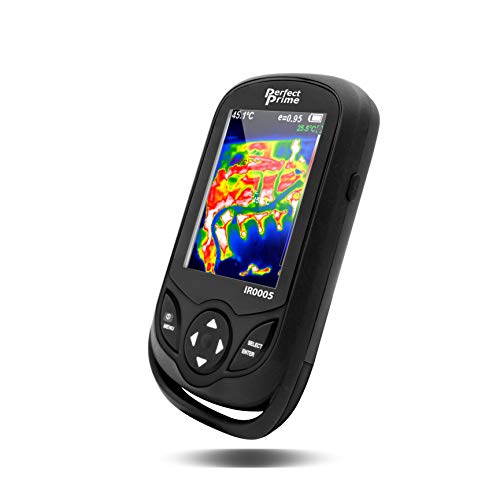
The PerfectPrime IR0005 has been purposefully redesigned to enable homeowners to easily carry it around in their pockets while being able to handle other goods. It is as small as a smartphone and has very easy to use navigation.
Perfect Prime IR0005 Infrared Thermal Imager Specifications
- IR
Image Resolution: 220 x 160 , 35,200 pixels - Display
Screen: 3.2″ Full-angle HD - Thermal
Sensitivity:0.07°C / 32.126°F - Wavelength
coverage: 8 -14 um - Field
angle / : 26° x 35°Shortest focus length: 4.0 mm - Temperature
Accuracy:+/- 2 % or +/- 2 °C - Emissivity:
Adjustable from 0.01 to 1.0 - Visible
Image Resolution:0.3 mega pixels Image - Capturing
Frequency: 9 Hz - Temperature
Range: -20 to 300 °C / -4 ~ 572°F
Check Out The Current Price Here
Parts of this article were used with permission from NACHI. The original article can be found here.
I like how you explained that a thermal imaging camera is best for finding moisture. This could help you find a leak that is coming from a pipe or tank of some sort. I’ll be sure to buy one of these so that I can use it to find any problems with my plumbing system.
Hi there! Love your site! I don’t think The FLIR TG165 Spot Thermal Camera is available anymore. What would be your next best option? Thank you!